
dns域名解析
· One min read

BMK
fmt.Sprintf()可以将float转成任意小数点位数的字符串,再用 strconv.ParseFloat(float64str,64)将float64的字符串转化为float


groups 查看当前登录用户的组内成员groups gliethttp 查看gliethttp用户所在的组,以及组内成员whoami 查看当前登录用户名/etc/group文件包含所有组
/etc/shadow和/etc/passwd系统存在的所有用户名
/etc/group 解说;/etc/group 文件是用户组的配置文件,内容包括用户和用户组,并且能显示出用户是归属哪个用户组或哪几个用户组,因为一个用户可以归属一个或多个不同的用户组;同一用 户组的用户之间具有相似的特征。比如我们把某一用户加入到root用户组,那么这个用户就可以浏览root用户家目录的文件,如果root用户把某个文件 的读写执行权限开放,root用户组的所有用户都可以修改此文件,如果是可执行的文件(比如脚本),root用户组的用户也是可以执行的;
用户组的特性在系统管理中为系统管理员提供了极大的方便,但安全性也是值得关注的,如某个用户下有对系统管理有最重要的内容,最好让用户拥有独立的用户组,或者是把用户下的文件的权限设置为完全私有;另外root用户组一般不要轻易把普通用户加入进去,
/etc/group 内容具体分析/etc/group 的内容包括用户组(Group)、用户组口令、GID及该用户组所包含的用户(User),每个用户组一条记录;格式如下:
group_name:passwd:GID:user_list
在/etc/group 中的每条记录分四个字段:
参考网址:http://fedora.linuxsir.org/main/?q=node/91
Linux 是一个多用户、多任务的操作系统;我们应该了解单用户多任务和多用户多任务的概念;
1、Linux 的单用户多任务;
单用户多任务;比如我们以beinan 登录系统,进入系统后,我要打开gedit 来写文档,但在写文档的过程中,我感觉少点音乐,所以又打开xmms 来点音乐;当然听点音乐还不行,MSN 还得打开,想知道几个弟兄现在正在做什么,这样一样,我在用beinan 用户登录时,执行了gedit 、xmms以及msn等,当然还有输入法fcitx ;这样说来就有点简单了,一个beinan用户,为了完成工作,执行了几个任务;当然beinan这个用户,其它的人还能以远程登录过来,也能做其它的工作。
2、Linux 的多用户、多任务;
有时可能是很多用户同时用同一个系统,但并不所有的用户都一定都要做同一件事,所以这就有多用户多任务之说;
举个例子,比如LinuxSir.Org 服务器,上面有FTP 用户、系统管理员、web 用户、常规普通用户等,在同一时刻,可能有的弟兄正在访问论坛;有的可能在上传软件包管理子站,比如luma 或Yuking 兄在管理他们的主页系统和FTP ;在与此同时,可能还会有系统管理员在维护系统;浏览主页的用的是nobody 用户,大家都用同一个,而上传软件包用的是FTP用户;管理员的对系统的维护或查看,可能用的是普通帐号或超级权限root帐号;不同用户所具有的权限也不同,要完成不同的任务得需要不同的用户,也可以说不同的用户,可能完成的工作也不一样;
值得注意的是:多用户多任务并不是大家同时挤到一接在一台机器的的键盘和显示器前来操作机器,多用户可能通过远程登录来进行,比如对服务器的远程控制,只要有用户权限任何人都是可以上去操作或访问的;
3、用户的角色区分;
用户在系统中是分角色的,在Linux 系统中,由于角色不同,权限和所完成的任务也不同;值得注意的是用户的角色是通过UID和识别的,特别是UID;在系统管理中,系统管理员一定要坚守UID 唯一的特性; root 用户:系统唯一,是真实的,可以登录系统,可以操作系统任何文件和命令,拥有最高权限; 虚拟用户:这类用户也被称之为伪用户或假用户,与真实用户区分开来,这类用户不具有登录系统的能力,但却是系统运行不可缺少的用户,比如bin、daemon、adm、ftp、mail等;这类用户都系统自身拥有的,而非后来添加的,当然我们也可以添加虚拟用户; 普通真实用户:这类用户能登录系统,但只能操作自己家目录的内容;权限有限;这类用户都是系统管理员自行添加的;
4、多用户操作系统的安全;
多用户系统从事实来说对系统管理更为方便。从安全角度来说,多用户管理的系统更为安全,比如beinan用户下的某个文件不想让其它用户看到,只是设置一下文件的权限,只有beinan一个用户可读可写可编辑就行了,这样一来只有beinan一个用户可以对其私有文件进行操作,Linux 在多用户下表现最佳,Linux能很好的保护每个用户的安全,但我们也得学会Linux 才是,再安全的系统,如果没有安全意识的管理员或管理技术,这样的系统也不是安全的。
从服务器角度来说,多用户的下的系统安全性也是最为重要的,我们常用的Windows 操作系统,它在系纺权限管理的能力只能说是一般般,根本没有没有办法和Linux或Unix 类系统相比;
1、用户(user)的概念;
通过前面对Linux 多用户的理解,我们明白Linux 是真正意义上的多用户操作系统,所以我们能在Linux系统中建若干用户(user)。比如我们的同事想用我的计算机,但我不想让他用我的用户名登录,因为我的用户名下有不想让别人看到的资料和信息(也就是隐私内容)这时我就可以给他建一个新的用户名,让他用我所开的用户名去折腾,这从计算机安全角度来说是符合操作规则的;
当然用户(user)的概念理解还不仅仅于此,在Linux系统中还有一些用户是用来完成特定任务的,比如nobody和ftp 等,我们访问LinuxSir.Org 的网页程序,就是nobody用户;我们匿名访问ftp 时,会用到用户ftp或nobody ;如果您想了解Linux系统的一些帐号,请查看 /etc/passwd ;
2、用户组(group)的概念;
用户组(group)就是具有相同特征的用户(user)的集合体;比如有时我们要让多个用户具有相同的权限,比如查看、修改某一文件或执行某个命令,这时我们需要用户组,我们把用户都定义到同一用户组,我们通过修改文件或目录的权限,让用户组具有一定的操作权限,这样用户组下的用户对该文件或目录都具有相同的权限,这是我们通过定义组和修改文件的权限来实现的;
举例:我们为了让一些用户有权限查看某一文档,比如是一个时间表,而编写时间表的人要具有读写执行的权限,我们想让一些用户知道这个时间表的内容,而不让他们修改,所以我们可以把这些用户都划到一个组,然后来修改这个文件的权限,让用户组可读,这样用户组下面的每个用户都是可读的;
用户和用户组的对应关系是:一对一、多对一、一对多或多对多;
1、与用户(user)和用户组(group)相关的配置文件;
1)与用户(user)相关的配置文件;
/etc/passwd 注:用户(user)的配置文件;/etc/shadow 注:用户(user)影子口令文件;2)与用户组(group)相关的配置文件;
/etc/group 注:用户组(group)配置文件;/etc/gshadow 注:用户组(group)的影子文件;2、管理用户(user)和用户组(group)的相关工具或命令;
1)管理用户(user)的工具或命令;
useradd # 注:添加用户
adduser # 注:添加用户
passwd # 注:为用户设置密码
usermod # 注:修改用户命令,可以通过usermod 来修改登录名、用户的家目录等等;
pwcov # 注:同步用户从/etc/passwd 到/etc/shadow
pwck # 注:pwck是校验用户配置文件/etc/passwd 和/etc/shadow 文件内容是否合法或完整;
pwunconv # 注:是pwcov 的立逆向操作,是从/etc/shadow和 /etc/passwd 创建/etc/passwd ,然后会删除 /etc/shadow 文件;
finger # 注:查看用户信息工具 id 注:查看用户的UID、GID及所归属的用户组 chfn 注:更改用户信息工具
su # 注:用户切换工具 sudo 注:sudo 是通过另一个用户来执行命令(execute a command as another user),su 是用来切换用户,然后通过切换到的用户来完成相应的任务,
但sudo 能后面直接执行命令,比如sudo 不需要root 密码就可以执行root 赋与的执行只有root才能执行相应的命令;但得通过visudo 来编辑/etc/sudoers来实现;
visudo # 注:visodo 是编辑 /etc/sudoers 的命令;也可以不用这个命令,直接用vi 来编辑 /etc/sudoers 的效果是一样的;
sudoedit # 注:和sudo 功能差不多;
2)管理用户组(group)的工具或命令;
groupadd #注:添加用户组;
groupdel #注:删除用户组;
groupmod #注:修改用户组信息
groups #注:显示用户所属的用户组
grpck grpconv #注:通过/etc/group和/etc/gshadow 的文件内容来同步或创建/etc/gshadow ,如果/etc/gshadow 不存在则创建;
grpunconv #注:通过/etc/group 和/etc/gshadow 文件内容来同步或创建/etc/group ,然后删除gshadow文件;
3、/etc/skel 目录;
/etc/skel目录一般是存放用户启动文件的目录,这个目录是由root权限控制,当我们添加用户时,这个目录下的文件自动复制到新添加的用户的家目录下;/etc/skel 目录下的文件都是隐藏文件,也就是类似.file格式的;我们可通过修改、添加、删除/etc/skel目录下的文件,来为用户提供一个统一、标准的、默认的用户环境;
[root@localhost beinan]# ls -la /etc/skel/
总用量 92
drwxr-xr-x    3 root root  4096  8月 11 23:32 .
drwxr-xr-x  115 root root 12288 10月 14 13:44 ..
-rw-r--r--    1 root root    24  5月 11 00:15 .bash_logout
-rw-r--r--    1 root root   191  5月 11 00:15 .bash_profile
-rw-r--r--    1 root root   124  5月 11 00:15 .bashrc
-rw-r--r--    1 root root  5619 2005-03-08  .canna
-rw-r--r--    1 root root   438  5月 18 15:23 .emacs
-rw-r--r--    1 root root   120  5月 23 05:18 .gtkrc
drwxr-xr-x    3 root root  4096  8月 11 23:16 .kde
-rw-r--r--    1 root root   658 2005-01-17  .zshrc
/etc/skel 目录下的文件,一般是我们用useradd 和adduser 命令添加用户(user)时,系统自动复制到新添加用户(user)的家目录下;如果我们通过修改 /etc/passwd 来添加用户时,我们可以自己创建用户的家目录,然后把/etc/skel 下的文件复制到用户的家目录下,然后要用chown 来改变新用户家目录的属主;
4、/etc/login.defs 配置文件;
/etc/login.defs 文件是当创建用户时的一些规划,比如创建用户时,是否需要家目录,UID和GID的范围;用户的期限等等,这个文件是可以通过root来定义的;
比如Fedora 的 /etc/logins.defs 文件内容;
# *REQUIRED* # Directory where mailboxes reside, _or_ name of file, relative to the # home directory. If you _do_ define both, MAIL_DIR takes precedence.
# QMAIL_DIR is for Qmail
# #QMAIL_DIR Maildir MAIL_DIR /var/spool/mail 注:创建用户时,要在目录/var/spool/mail中创建一个用户mail文件; #MAIL_FILE .mail
# Password aging controls: #
# PASS_MAX_DAYS Maximum number of days a password may be used.
# PASS_MIN_DAYS Minimum number of days allowed between password changes.
# PASS_MIN_LEN Minimum acceptable password length.
# PASS_WARN_AGE Number of days warning given before a password expires.
# PASS_MAX_DAYS 99999 注:用户的密码不过期最多的天数;
PASS_MIN_DAYS 0 注:密码修改之间最小的天数;
PASS_MIN_LEN 5 注:密码最小长度;
PASS_WARN_AGE 7 注: #
# Min/max values for automatic uid selection in useradd
# UID_MIN 500 注:最小UID为500 ,也就是说添加用户时,UID 是从500开始的; UID_MAX 60000 注:最大UID为60000; #
# Min/max values for automatic gid selection in groupadd # GID_MIN 500 注:GID 是从500开始; GID_MAX 60000 #
# If defined, this command is run when removing a user.
# It should remove any at/cron/print jobs etc. owned by
# the user to be removed (passed as the first argument). #
#USERDEL_CMD /usr/sbin/userdel_local #
# If useradd should create home directories for users by default
# On RH systems, we do. This option is ORed with the -m flag on
# useradd command line
. # CREATE_HOME yes 注:是否创用户家目录,要求创建;
5、/etc/default/useradd 文件;
通过useradd 添加用户时的规则文件;
# useradd defaults file
GROUP=100
HOME=/home  #注:把用户的家目录建在/home中;
INACTIVE=-1  #注:是否启用帐号过期停权,-1表示不启用;
EXPIRE=   #注:帐号终止日期,不设置表示不启用;
SHELL=/bin/bash  #注:所用SHELL的类型;
SKEL=/etc/skel   #注: 默认添加用户的目录默认文件存放位置;也就是说,当我们用adduser添加用户时,用户家目录下的文件,都是从这个目录中复制过去的;
后记:
关于用户(user)和用户组(group)管理内容大约就是这么多;只要把上面所说的内容了解和掌握,用户(user)和用户组(group)管理就差不多了;由于用户(user)和用户组(group)是和文件及目录权限联系在一起的,所以文件及目录权限的操作也会独立成文来给大家介绍;
本文只是让新手弟兄明白用户(user)和用户组(group)一些原理,所以我在写此文的时候,大多是解说内容,我的意思是通过解说和索引一些命令,让新手弟兄明白一点理论是比较重要的,技术操作无非是命令的用法
参考网址:http://www.sourcejoy.com/other_dev_tech/linux-user-and-file-manage.html
最近打算更仔细学习一下linux操作系统。先是恶补了一下用户、用户组、文件权限这三样比较重要的知识。
学习这几样东西,得先掌握linux的权限系统相关知识。
linux的权限系统主要是由用户、用户组和权限组成。
用户就是一个个的登录并使用linux的用户。linux内部用UID表示。
用户组就是用户的分组。linux内部用GID表示。
权限分为读、写、执行三种权限。
linux的用户信息保存在/etc/passwd文件中,另外,/etc/shadow文件存放的是用户密码相关信息。
/etc/passwd文件格式:用户名:密码:UID:GID:用户信息:HOME目录路径:用户shell
其中UID为0则是用户root,1~499为系统用户,500以上为普通用户
/etc/shadow保存用户密码信息,包括加密后的密码,密码过期时间,密码过期提示天数等。
用户组信息保存在/etc/group文件中.
格式如下:
用户组名:组密码:GID:组内帐号(多个帐号用逗号分隔)
用户登录后,/etc/passwd文件里的GID为用户的初始用户组。
用户的初始用户组这一事实不会再/etc/group中体现。
查看当前用户的用户组命令:
[root@local opt]#groups
root bin daemon sys adm disk wheel
输出的信息中,第一个用户组为当前用户的有效用户组(当前用户组)
切换有效用户组命令:
[root@local opt]#newgrp 用户组名
要离开新的有效用户组,则输入exit回车。
新建用户命令:
[root@local opt]#useradd 用户名 -g 初始用户组 -G 其他用户组(修改/etc/group) -c 用户说明 -u 指定UID
建完用户需要为用户设置密码:
[root@local opt]#passwd 用户名
用户要修改自己密码命令:
[root@local opt]#passwd
修改用户信息命令:
[root@local opt]#usermod 参数 用户名
参数:
-c 说明-g 组名 初始用户组-e 过期日期 格式:YYYY-MM-DD-G 组名 其他用户组-l 修改用户名-L 锁定账号(在``/etc/shadow文件中用户对应密码密码串的前面加上两个叹号(!!))-U 解锁删除用户命令:
[root@local opt]#userdel [-r] 用户名
其中,参数-r为删除用户的home目录。
其实,可能在系统其他地方也有该用户文件,要完整删除一个用户和其文件要先找到属于他的文件:
[root@local opt]#find / -user 用户名
然后删除,再运行userdel删除用户。
查看可用shell命令:
[root@local opt]#chsh -l
修改自己的shell命令:
[root@local opt]#chsh -s
查看自己或某人UID/GID信息:
[root@local opt]#id [用户名]
返回信息中groups为有效用户组
新增用户组命令:
[root@local opt]#groupadd 用户组名
修改用户组名命令:
[root@local opt]#groupmod -n 名称
删除用户组命令:
[root@local opt]#groupdel 用户组名
设置用户组密码命令:
[root@local opt]#gpasswd 用户组名
如果gpasswd加上参数则有其他功能
设置用户组管理员命令:
[root@local opt]#gpasswd -A 用户名 用户组名
添加某帐号到组命令:
[root@local opt]#gpasswd -M 用户名 用户组名
从组中删除某帐号命令:
[root@local opt]#gpasswd -d 用户名 用户组名
passwd相关参数操作:
-l 锁用户-u 解锁用户-n 天数 密码不可改天数-x 天数 密码过期天数-w 天数 警告天数先看个实例:
[root@local opt]#ls -al
ls -al 命令是列出目录的所有文件,包括隐藏文件。隐藏文件的文件名第一个字符为'.'
-rw-r--r--  1 root root    81 08-02 14:54 gtkrc-1.2-gnome2
-rw-------  1 root root   189 08-02 14:54 ICEauthority
-rw-------  1 root root    35 08-05 10:02 .lesshst
drwx------  3 root root  4096 08-02 14:54 .metacity
drwxr-xr-x  3 root root  4096 08-02 14:54 nautilus
列表的列定义如下:
[权限属性信息] [连接数] [拥有者] [拥有者所属用户组] [大小] [最后修改时间] [文件名]
权限属性列表为10个字符:
修改文件所属组命令:
[root@local opt]#chgrp [-R] 组名 文件名
其中-R为递归设置
修改文件的所有者和组命令:
[root@local opt]#chown [-R] 用户[:用户组] 文件名
修改文件访问权限命令:
[root@local opt]#chmod [-R] 0777 文件名
至此,用户、文件和权限相关的东西,就总结个7788了,接下来的就是,平常要敢于用各种命令,勤于看看本篇总结啦。
====================================================================
whois
功能说明:查找并显示用户信息。
语  法:whois [帐号名称]
补充说明:whois指令会去查找并显示指定帐号的用户相关信息,因为它是到Network Solutions 的WHOIS数据库去查找,所以该帐号名称必须在上面注册方能寻获,且名称没有大小写的差别。
---------------------------------------------------------
whoami
功能说明:先似乎用户名称。
语  法:whoami [--help][--version]
补充说明:显示自身的用户名称,本指令相当于执行"id -un"指令。
参  数:
--help  在线帮助。
--version  显示版本信息。
---------------------------------------------------
who
功能说明:显示目前登入系统的用户信息。
语  法:who [-Himqsw][--help][--version][am i][记录文件]
补充说明:执行这项指令可得知目前有那些用户登入系统,单独执行who指令会列出登入帐号,使用的    终端机,登入时间以及从何处登入或正在使用哪个X显示器。
参  数:
-H或--heading  显示各栏位的标题信息列。
-i或-u或--idle  显示闲置时间,若该用户在前一分钟之内有进行任何动作,将标示成"."号,如果该用户已超过24小时没有任何动作,则标示出"old"字符串。
-m  此参数的效果和指定"am i"字符串相同。
-q或--count  只显示登入系统的帐号名称和总人数。
-s  此参数将忽略不予处理,仅负责解决who指令其他版本的兼容性问题。
-w或-T或--mesg或--message或--writable  显示用户的信息状态栏。
--help  在线帮助。
--version  显示版本信息。
----------------------------------------------------
w
功能说明:显示目前登入系统的用户信息。
语  法:w [-fhlsuV][用户名称]
补充说明:执行这项指令可得知目前登入系统的用户有那些人,以及他们正在执行的程序。单独执行w
指令会显示所有的用户,您也可指定用户名称,仅显示某位用户的相关信息。
参  数:
-f  开启或关闭显示用户从何处登入系统。
-h  不显示各栏位的标题信息列。
-l  使用详细格式列表,此为预设值。
-s  使用简洁格式列表,不显示用户登入时间,终端机阶段作业和程序所耗费的CPU时间。
-u  忽略执行程序的名称,以及该程序耗费CPU时间的信息。
-V  显示版本信息。
-----------------------------------------------------
finger命令
finger 命令的功能是查询用户的信息,通常会显示系统中某个用户的用户名、主目录、停滞时间、登录时间、登录shell等信息。如果要查询远程机上的用户信息,需要在用户名后面接“@主机名”,采用[用户名@主机名]的格式,不过要查询的网络主机需要运行finger守护进程。
该命令的一般格式为:
finger [选项] [使用者] [用户@主机]
命令中各选项的含义如下:
-s 显示用户的注册名、实际姓名、终端名称、写状态、停滞时间、登录时间等信息。
-l 除了用-s选项显示的信息外,还显示用户主目录、登录shell、邮件状态等信息,以及用户主目录下的.plan、.project和.forward文件的内容。
-p 除了不显示.plan文件和.project文件以外,与-l选项相同。
[例]在本地机上使用finger命令。
$ finger xxq
Login: xxq Name:
Directory: /home/xxq Shell: /bin/bash
Last login Thu Jan 1 21:43 (CST) on tty1
No mail.
No Plan.
$ finger
Login Name Tty Idle Login Time Office Office Phone
root root *1 28 Nov 25 09:17
……
------------------------------------------------------------------
/etc/group文件包含所有组
/etc/shadow和/etc/passwd系统存在的所有用户名
修改当前用户所属组的方法
usermod 或者可以直接修改 /etc/paaawd文件即可
----------------------------------------------------------------
vlock(virtual console lock)
功能说明:锁住虚拟终端。
语  法:vlock [-achv]
补充说明:执行vlock指令可锁住虚拟终端,避免他人使用。
参  数:
-a或--all  锁住所有的终端阶段作业,如果您在全屏幕的终端中使用本参数,则会将用键盘
切换终端机的功能一并关闭。
-c或--current  锁住目前的终端阶段作业,此为预设值。
-h或--help  在线帮助。
-v或--version  显示版本信息。
--------------------------------------------------------
usermod
功能说明:修改用户帐号。
语  法:usermod [-LU][-c <备注>][-d <登入目录>][-e <有效期限>][-f <缓冲天数>][-g <群组>][-G <群组>][-l <帐号名称>][-s ][-u ][用户帐号]
补充说明:usermod可用来修改用户帐号的各项设定。
参  数:
-c<备注>  修改用户帐号的备注文字。
-d登入目录>  修改用户登入时的目录。
-e<有效期限>  修改帐号的有效期限。
-f<缓冲天数>  修改在密码过期后多少天即关闭该帐号。
-g<群组>  修改用户所属的群组。
-G<群组>  修改用户所属的附加群组。
-l<帐号名称>  修改用户帐号名称。
-L  锁定用户密码,使密码无效。
-s  修改用户登入后所使用的shell。
-u  修改用户ID。
-U  解除密码锁定。
-------------------------------------------------------
userdel
功能说明:删除用户帐号。
语  法:userdel [-r][用户帐号]
补充说明:userdel可删除用户帐号与相关的文件。若不加参数,则仅删除用户帐号,而不删除相关文件。
参  数:
-f  删除用户登入目录以及目录中所有文件。
----------------------------------------------------------
userconf
功能说明:用户帐号设置程序。
语  法:userconf [--addgroup <群组>][--adduser <用户ID><群组><用户名称>][--delgroup <群组>][--deluser <用户ID>][--help]
补充说明:userconf实际上为linuxconf的符号连接,提供图形界面的操作方式,供管理员建立与管理各类帐号。若不加任何参数,即进入图形界面。
参  数:
--addgroup<群组>  新增群组。
--adduser<用户ID><群组><用户名称>  新增用户帐号。
--delgroup<群组>  删除群组。
--deluser<用户ID>  删除用户帐号。
--help  显示帮助。
------------------------------------------------------
useradd
功能说明:建立用户帐号。
语  法:useradd [-mMnr][-c <备注>][-d <登入目录>][-e <有效期限>][-f <缓冲天数>][-g <群组>][-G <群组>][-s ][-u ][用户帐号] 或 useradd -D [-b][-e <有效期限>][-f <缓冲天数>][-g <群组>][-G <群组>][-s ]
补充说明:useradd可用来建立用户帐号。帐号建好之后,再用passwd设定帐号的密码.而可用userdel删除帐号。使用useradd指令所建立的帐号,实际上是保存在/etc/passwd文本文件中。
参  数:
-c<备注>  加上备注文字。备注文字会保存在passwd的备注栏位中。
-d<登入目录>  指定用户登入时的启始目录。
-D  变更预设值.
-e<有效期限>  指定帐号的有效期限。
-f<缓冲天数>  指定在密码过期后多少天即关闭该帐号。
-g<群组>  指定用户所属的群组。
-G<群组>  指定用户所属的附加群组。
-m  自动建立用户的登入目录。
-M  不要自动建立用户的登入目录。
-n  取消建立以用户名称为名的群组.
-r  建立系统帐号。
-s   指定用户登入后所使用的shell。
-u  指定用户ID。
经常会遇到一个问题就是exec.Command("").Run(),有时候好用,有时候压根儿不执行,就好比这个,你只有知道error的原因,才能对症下药

那么 exit code 23是什么意思呢?
在linux中进程退出之后会有一个退出状态,可以通过$echo $?进行查看。
如果说把进程比作一个人(病人和正常人)的话那么进程退出码就可以看做是病人的症状!
挺好用的如果你发现执行某个命令或自己编写的代码生成的ELF文件发现毛都没发生过就可以通过该指令进行查看。
那么不同的退查状态又说明进程发生了什么了呢?可以通过perror进行查看!下面是通过通过perror指令查看得到的所有的退出码的解析(en)。
OS error code   0:  Success
OS error code   1:  Operation not permitted
OS error code   2:  No such file or directory
OS error code   3:  No such process
OS error code   4:  Interrupted system call
OS error code   5:  Input/output error
OS error code   6:  No such device or address
OS error code   7:  Argument list too long
OS error code   8:  Exec format error
OS error code   9:  Bad file descriptor
OS error code  10:  No child processes
OS error code  11:  Resource temporarily unavailable
OS error code  12:  Cannot allocate memory
OS error code  13:  Permission denied
OS error code  14:  Bad address
OS error code  15:  Block device required
OS error code  16:  Device or resource busy
OS error code  17:  File exists
OS error code  18:  Invalid cross-device link
OS error code  19:  No such device
OS error code  20:  Not a directory
OS error code  21:  Is a directory
OS error code  22:  Invalid argument
OS error code  23:  Too many open files in system
OS error code  24:  Too many open files
OS error code  25:  Inappropriate ioctl for device
OS error code  26:  Text file busy
OS error code  27:  File too large
OS error code  28:  No space left on device
OS error code  29:  Illegal seek
OS error code  30:  Read-only file system
OS error code  31:  Too many links
OS error code  32:  Broken pipe
OS error code  33:  Numerical argument out of domain
OS error code  34:  Numerical result out of range
OS error code  35:  Resource deadlock avoided
OS error code  36:  File name too long
OS error code  37:  No locks available
OS error code  38:  Function not implemented
OS error code  39:  Directory not empty
OS error code  40:  Too many levels of symbolic links
Illegal error code: 41
OS error code  42:  No message of desired type
OS error code  43:  Identifier removed
OS error code  44:  Channel number out of range
OS error code  45:  Level 2 not synchronized
OS error code  46:  Level 3 halted
OS error code  47:  Level 3 reset
OS error code  48:  Link number out of range
OS error code  49:  Protocol driver not attached
OS error code  50:  No CSI structure available
OS error code  51:  Level 2 halted
OS error code  52:  Invalid exchange
OS error code  53:  Invalid request descriptor
OS error code  54:  Exchange full
OS error code  55:  No anode
OS error code  56:  Invalid request code
OS error code  57:  Invalid slot
Illegal error code: 58
OS error code  59:  Bad font file format
OS error code  60:  Device not a stream
OS error code  61:  No data available
OS error code  62:  Timer expired
OS error code  63:  Out of streams resources
OS error code  64:  Machine is not on the network
OS error code  65:  Package not installed
OS error code  66:  Object is remote
OS error code  67:  Link has been severed
OS error code  68:  Advertise error
OS error code  69:  Srmount error
OS error code  70:  Communication error on send
OS error code  71:  Protocol error
OS error code  72:  Multihop attempted
OS error code  73:  RFS specific error
OS error code  74:  Bad message
OS error code  75:  Value too large for defined data type
OS error code  76:  Name not unique on network
OS error code  77:  File descriptor in bad state
OS error code  78:  Remote address changed
OS error code  79:  Can not access a needed shared library
OS error code  80:  Accessing a corrupted shared library
OS error code  81:  .lib section in a.out corrupted
OS error code  82:  Attempting to link in too many shared libraries
OS error code  83:  Cannot exec a shared library directly
OS error code  84:  Invalid or incomplete multibyte or wide character
OS error code  85:  Interrupted system call should be restarted
OS error code  86:  Streams pipe error
OS error code  87:  Too many users
OS error code  88:  Socket operation on non-socket
OS error code  89:  Destination address required
OS error code  90:  Message too long
OS error code  91:  Protocol wrong type for socket
OS error code  92:  Protocol not available
OS error code  93:  Protocol not supported
OS error code  94:  Socket type not supported
OS error code  95:  Operation not supported
OS error code  96:  Protocol family not supported
OS error code  97:  Address family not supported by protocol
OS error code  98:  Address already in use
OS error code  99:  Cannot assign requested address
OS error code 100:  Network is down
OS error code 101:  Network is unreachable
OS error code 102:  Network dropped connection on reset
OS error code 103:  Software caused connection abort
OS error code 104:  Connection reset by peer
OS error code 105:  No buffer space available
OS error code 106:  Transport endpoint is already connected
OS error code 107:  Transport endpoint is not connected
OS error code 108:  Cannot send after transport endpoint shutdown
OS error code 109:  Too many references: cannot splice
OS error code 110:  Connection timed out
OS error code 111:  Connection refused
OS error code 112:  Host is down
OS error code 113:  No route to host
OS error code 114:  Operation already in progress
OS error code 115:  Operation now in progress
OS error code 116:  Stale NFS file handle
OS error code 117:  Structure needs cleaning
OS error code 118:  Not a XENIX named type file
OS error code 119:  No XENIX semaphores available
OS error code 120:  Is a named type file
MySQL error code 120: Didn't find key on read or update
OS error code 121:  Remote I/O error
MySQL error code 121: Duplicate key on write or update
OS error code 122:  Disk quota exceeded
MySQL error code 122: Internal (unspecified) error in handler
OS error code 123:  No medium found
MySQL error code 123: Someone has changed the row since it was read (while the table was locked to prevent it)
OS error code 124:  Wrong medium type
MySQL error code 124: Wrong index given to function
OS error code 125:  Operation canceled
MySQL error code 125: Undefined handler error 125
OS error code 126:  Required key not available
MySQL error code 126: Index file is crashed
OS error code 127:  Key has expired
MySQL error code 127: Record file is crashed
OS error code 128:  Key has been revoked
MySQL error code 128: Out of memory in engine
OS error code 129:  Key was rejected by service
MySQL error code 129: Undefined handler error 129
OS error code 130:  Owner died
MySQL error code 130: Incorrect file format
OS error code 131:  State not recoverable
MySQL error code 131: Command not supported by database
OS error code 132:  Operation not possible due to RF-kill
MySQL error code 132: Old database file
MySQL error code 133: No record read before update
MySQL error code 134: Record was already deleted (or record file crashed)
MySQL error code 135: No more room in record file
MySQL error code 136: No more room in index file
MySQL error code 137: No more records (read after end of file)
MySQL error code 138: Unsupported extension used for table
MySQL error code 139: Too big row
MySQL error code 140: Wrong create options
MySQL error code 141: Duplicate unique key or constraint on write or update
MySQL error code 142: Unknown character set used in table
MySQL error code 143: Conflicting table definitions in sub-tables of MERGE table
MySQL error code 144: Table is crashed and last repair failed
MySQL error code 145: Table was marked as crashed and should be repaired
MySQL error code 146: Lock timed out; Retry transaction
MySQL error code 147: Lock table is full;  Restart program with a larger locktable
MySQL error code 148: Updates are not allowed under a read only transactions
MySQL error code 149: Lock deadlock; Retry transaction
MySQL error code 150: Foreign key constraint is incorrectly formed
MySQL error code 151: Cannot add a child row
MySQL error code 152: Cannot delete a parent row
MySQL error code 153: No savepoint with that name
MySQL error code 154: Non unique key block size
MySQL error code 155: The table does not exist in engine
MySQL error code 156: The table already existed in storage engine
MySQL error code 157: Could not connect to storage engine
MySQL error code 158: Unexpected null pointer found when using spatial index
MySQL error code 159: The table changed in storage engine
MySQL error code 160: There's no partition in table for the given value
MySQL error code 161: Row-based binlogging of row failed
MySQL error code 162: Index needed in foreign key constraint
MySQL error code 163: Upholding foreign key constraints would lead to a duplicate key error in some other table
MySQL error code 164: Table needs to be upgraded before it can be used
MySQL error code 165: Table is read only
MySQL error code 166: Failed to get next auto increment value
MySQL error code 167: Failed to set row auto increment value
MySQL error code 168: Unknown (generic) error from engine
MySQL error code 169: Record is the same
MySQL error code 170: It is not possible to log this statement
MySQL error code 171: The event was corrupt, leading to illegal data being read
MySQL error code 172: The table is of a new format not supported by this version
MySQL error code 173: The event could not be processed no other hanlder error happened
MySQL error code 174: Got a fatal error during initialzaction of handler
MySQL error code 175: File to short; Expected more data in file
MySQL error code 176: Read page with wrong checksum
MySQL error code 177: Too many active concurrent transactions
Illegal error code: 178
Illegal error code: 179
Illegal error code: 180
Illegal error code: 181
Illegal error code: 182
Illegal error code: 183
Illegal error code: 184
Illegal error code: 185
Illegal error code: 186
Illegal error code: 187
Illegal error code: 188
Illegal error code: 189
Illegal error code: 190
Illegal error code: 191
Illegal error code: 192
Illegal error code: 193
Illegal error code: 194
Illegal error code: 195
Illegal error code: 196
Illegal error code: 197
Illegal error code: 198
Illegal error code: 199
Illegal error code: 200
Illegal error code: 201
Illegal error code: 202
Illegal error code: 203
Illegal error code: 204
Illegal error code: 205
Illegal error code: 206
Illegal error code: 207
Illegal error code: 208
Illegal error code: 209
Illegal error code: 210
Illegal error code: 211
Illegal error code: 212
Illegal error code: 213
Illegal error code: 214
Illegal error code: 215
Illegal error code: 216
Illegal error code: 217
Illegal error code: 218
Illegal error code: 219
Illegal error code: 220
Illegal error code: 221
Illegal error code: 222
Illegal error code: 223
Illegal error code: 224
Illegal error code: 225
Illegal error code: 226
Illegal error code: 227
Illegal error code: 228
Illegal error code: 229
Illegal error code: 230
Illegal error code: 231
Illegal error code: 232
Illegal error code: 233
Illegal error code: 234
Illegal error code: 235
Illegal error code: 236
Illegal error code: 237
Illegal error code: 238
Illegal error code: 239
Illegal error code: 240
Illegal error code: 241
Illegal error code: 242
Illegal error code: 243
Illegal error code: 244
Illegal error code: 245
Illegal error code: 246
Illegal error code: 247
Illegal error code: 248
Illegal error code: 249
Illegal error code: 250
Illegal error code: 251
Illegal error code: 252
Illegal error code: 253
Illegal error code: 254
Illegal error code: 255
知道了这些退出码之后自己写shell程序的时候就可以选择适当的退出码了!
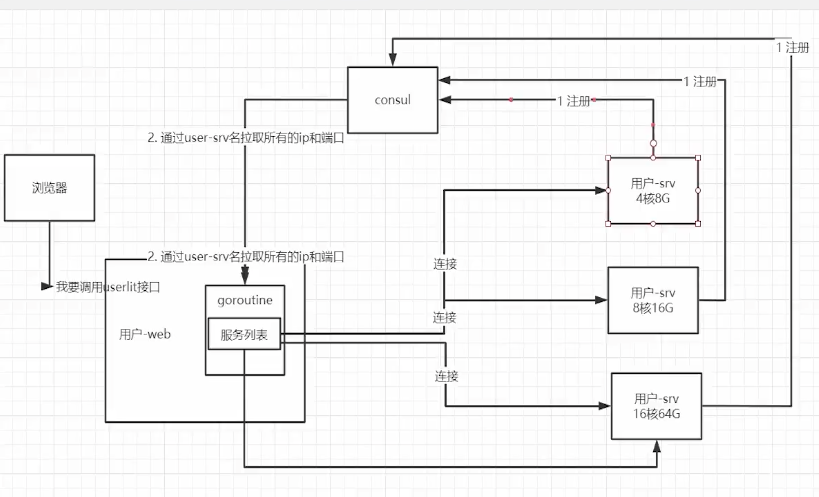
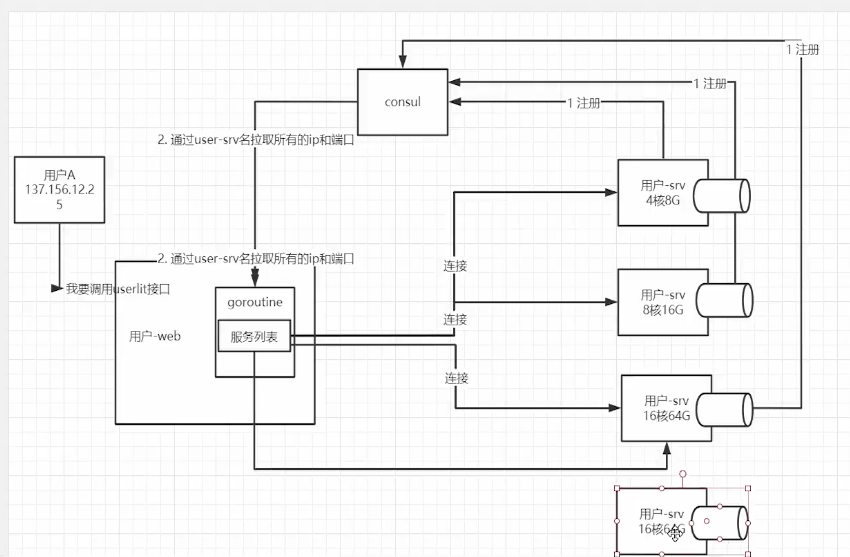
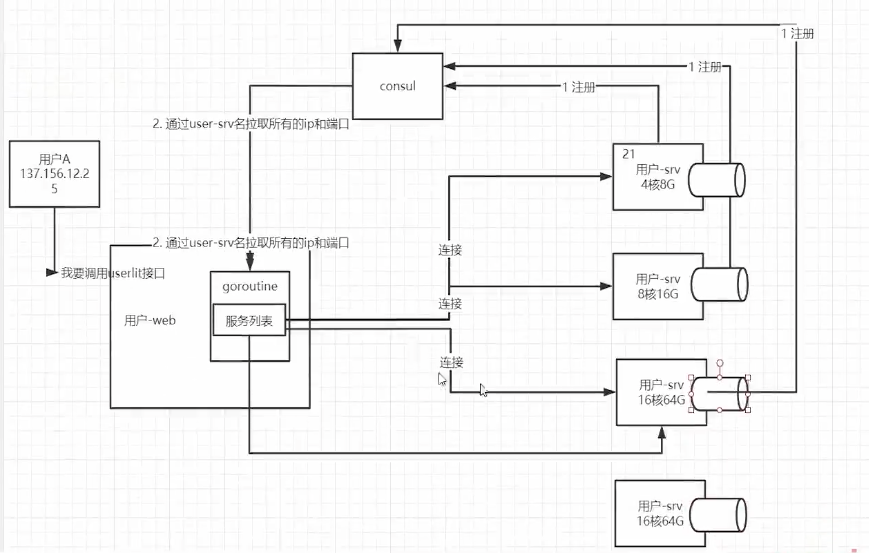
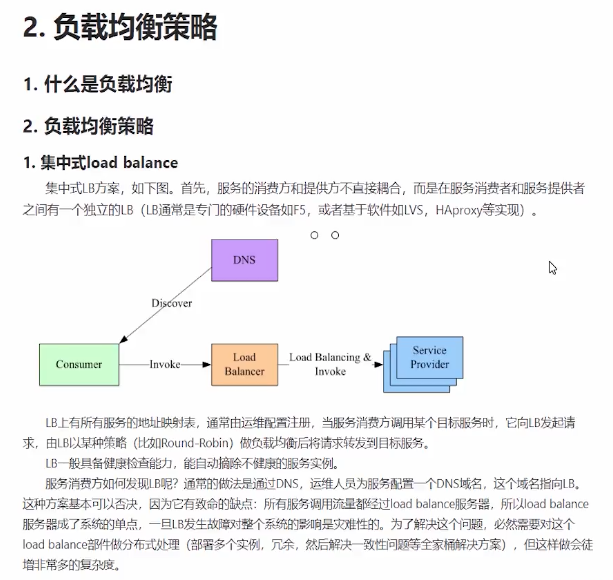
在分布式系统中,多台服务器同时提供一个服务,并统一到服务配置中心进行管理,消费者 通过查询服务配置中心,获取到服务到地址列表,需要选取其中一台来发起RPC远程调用。如何 选择,则取决于具体的负载均衡算法,对应于不同的场景,选择的负载均衡算法也不尽相同。负 载均衡算法的种类有很多种,常见的负载均衡算法包括轮询法、随机法、源地址哈希法、加权轮 询法、加权随机法、最小连接法等,应根据具体的使用场景选取对应的算法。
轮询很容易实现,将请求按顺序轮流分配到后台服务器上,均衡的对待每一台服务器,而不 关心服务器实际的连接数和当前的系统负载。
通过系统随机函数,根据后台服务器列表的大小值来随机选取其中一台进行访问。由概率概 率统计理论可以得知,随着调用量的增大,其实际效果越来越接近于平均分配流量到后台的每一 台服务器,也就是轮询法的效果。
源地址哈希法的思想是根据服务消费者请求客户端的IP地址,通过哈希函数计算得到一个哈 希值,将此哈希值和服务器列表的大小进行取模运算,得到的结果便是要访问的服务器地址的序 号。采用源地址哈希法进行负载均衡,相同的IP客户端,如果服务器列表不变,将映射到同一个 后台服务器进行访问。
不同的后台服务器可能机器的配置和当前系统的负载并不相同,因此它们的抗压能力也不一 样。跟配置高、负载低的机器分配更高的权重,使其能处理更多的请求,而配置低、负载高的机 器,则给其分配较低的权重,降低其系统负载,加权轮询很好的处理了这一问题,并将请求按照 顺序且根据权重分配给后端。
加权随机法跟加权轮询法类似,根据后台服务器不同的配置和负载情况,配置不同的权重。 不同的是,它是按照权重来随机选取服务器的,而非顺序。
前面我们费尽心思来实现服务消费者请求次数分配的均衡,我们知道这样做是没错的,可以 为后端的多台服务器平均分配工作量,最大程度地提高服务器的利用率,但是,实际上,请求次 数的均衡并不代表负载的均衡。因此我们需要介绍最小连接数法,最小连接数法比较灵活和智 能,由于后台服务器的配置不尽相同,对请求的处理有快有慢,它正是根据后端服务器当前的连 接情况,动态的选取其中当前积压连接数最少的一台服务器来处理当前请求,尽可能的提高后台 服务器利用率,将负载合理的分流到每一台服务器。


![]()
Nacos-sdk-go是Nacos的Go语言客户端,它实现了服务发现和动态配置的功能
支持Go>v1.12版本
支持Nacos>1.x版本
使用go get安装SDK:
$ go get -u github.com/nacos-group/nacos-sdk-go
constant.ClientConfig{
  TimeoutMs            uint64 // 请求Nacos服务端的超时时间,默认是10000ms
  NamespaceId          string // ACM的命名空间Id
  Endpoint             string // 当使用ACM时,需要该配置. https://help.aliyun.com/document_detail/130146.html
  RegionId             string // ACM&KMS的regionId,用于配置中心的鉴权
  AccessKey            string // ACM&KMS的AccessKey,用于配置中心的鉴权
  SecretKey            string // ACM&KMS的SecretKey,用于配置中心的鉴权
  OpenKMS              bool   // 是否开启kms,默认不开启,kms可以参考文档 https://help.aliyun.com/product/28933.html
                              // 同时DataId必须以"cipher-"作为前缀才会启动加解密逻辑
  CacheDir             string // 缓存service信息的目录,默认是当前运行目录
  UpdateThreadNum      int    // 监听service变化的并发数,默认20
  NotLoadCacheAtStart  bool   // 在启动的时候不读取缓存在CacheDir的service信息
  UpdateCacheWhenEmpty bool   // 当service返回的实例列表为空时,不更新缓存,用于推空保护
  Username             string // Nacos服务端的API鉴权Username
  Password             string // Nacos服务端的API鉴权Password
  LogDir               string // 日志存储路径
  RotateTime           string // 日志轮转周期,比如:30m, 1h, 24h, 默认是24h
  MaxAge               int64  // 日志最大文件数,默认3
  LogLevel             string // 日志默认级别,值必须是:debug,info,warn,error,默认值是info
}
constant.ServerConfig{
  ContextPath string // Nacos的ContextPath
  IpAddr      string // Nacos的服务地址
  Port        uint64 // Nacos的服务端口
  Scheme      string // Nacos的服务地址前缀
}
// 创建clientConfig
clientConfig := constant.ClientConfig{
  NamespaceId:         "e525eafa-f7d7-4029-83d9-008937f9d468", // 如果需要支持多namespace,我们可以场景多个client,它们有不同的NamespaceId。当namespace是public时,此处填空字符串。
  TimeoutMs:           5000,
  NotLoadCacheAtStart: true,
  LogDir:              "/tmp/nacos/log",
  CacheDir:            "/tmp/nacos/cache",
  RotateTime:          "1h",
  MaxAge:              3,
  LogLevel:            "debug",
}

// 创建clientConfig的另一种方式
clientConfig := *constant.NewClientConfig(
    constant.WithNamespaceId("e525eafa-f7d7-4029-83d9-008937f9d468"), //当namespace是public时,此处填空字符串。
    constant.WithTimeoutMs(5000),
    constant.WithNotLoadCacheAtStart(true),
    constant.WithLogDir("/tmp/nacos/log"),
    constant.WithCacheDir("/tmp/nacos/cache"),
    constant.WithRotateTime("1h"),
    constant.WithMaxAge(3),
    constant.WithLogLevel("debug"),
)

// 至少一个ServerConfig
serverConfigs := []constant.ServerConfig{
    {
        IpAddr:      "console1.nacos.io",
        ContextPath: "/nacos",
        Port:        80,
        Scheme:      "http",
    },
    {
      IpAddr:      "console2.nacos.io",
      ContextPath: "/nacos",
      Port:        80,
        Scheme:      "http",
    },
}

// 创建serverConfig的另一种方式
serverConfigs := []constant.ServerConfig{
    *constant.NewServerConfig(
        "console1.nacos.io",
        80,
        constant.WithScheme("http"),
        constant.WithContextPath("/nacos")
    ),
    *constant.NewServerConfig(
        "console2.nacos.io",
        80,
        constant.WithScheme("http"),
        constant.WithContextPath("/nacos")
    ),
}

// 创建服务发现客户端
_, _ := clients.CreateNamingClient(map[string]interface{}{
  "serverConfigs": serverConfigs,
  "clientConfig":  clientConfig,
})

// 创建动态配置客户端
_, _ := clients.CreateConfigClient(map[string]interface{}{
  "serverConfigs": serverConfigs,
  "clientConfig":  clientConfig,
})

// 创建服务发现客户端的另一种方式 (推荐)
namingClient, err := clients.NewNamingClient(
    vo.NacosClientParam{
        ClientConfig:  &clientConfig,
        ServerConfigs: serverConfigs,
    },
)

// 创建动态配置客户端的另一种方式 (推荐)
configClient, err := clients.NewConfigClient(
    vo.NacosClientParam{
        ClientConfig:  &clientConfig,
        ServerConfigs: serverConfigs,
    },
)
https://help.aliyun.com/document_detail/130146.html
cc := constant.ClientConfig{
  Endpoint:    "acm.aliyun.com:8080",
  NamespaceId: "e525eafa-f7d7-4029-83d9-008937f9d468",
  RegionId:    "cn-shanghai",
  AccessKey:   "LTAI4G8KxxxxxxxxxxxxxbwZLBr",
  SecretKey:   "n5jTL9YxxxxxxxxxxxxaxmPLZV9",
  OpenKMS:     true,
  TimeoutMs:   5000,
  LogLevel:    "debug",
}

// a more graceful way to create config client
client, err := clients.NewConfigClient(
  vo.NacosClientParam{
    ClientConfig: &cc,
  },
)
success, err := namingClient.RegisterInstance(vo.RegisterInstanceParam{
    Ip:          "10.0.0.11",
    Port:        8848,
    ServiceName: "demo.go",
    Weight:      10,
    Enable:      true,
    Healthy:     true,
    Ephemeral:   true,
    Metadata:    map[string]string{"idc":"shanghai"},
    ClusterName: "cluster-a", // 默认值DEFAULT
    GroupName:   "group-a",   // 默认值DEFAULT_GROUP
})
success, err := namingClient.DeregisterInstance(vo.DeregisterInstanceParam{
    Ip:          "10.0.0.11",
    Port:        8848,
    ServiceName: "demo.go",
    Ephemeral:   true,
    Cluster:     "cluster-a", // 默认值DEFAULT
    GroupName:   "group-a",   // 默认值DEFAULT_GROUP
})
services, err := namingClient.GetService(vo.GetServiceParam{
    ServiceName: "demo.go",
    Clusters:    []string{"cluster-a"}, // 默认值DEFAULT
    GroupName:   "group-a",             // 默认值DEFAULT_GROUP
})
// SelectAllInstance可以返回全部实例列表,包括healthy=false,enable=false,weight<=0
instances, err := namingClient.SelectAllInstances(vo.SelectAllInstancesParam{
    ServiceName: "demo.go",
    GroupName:   "group-a",             // 默认值DEFAULT_GROUP
    Clusters:    []string{"cluster-a"}, // 默认值DEFAULT
})
// SelectInstances 只返回满足这些条件的实例列表:healthy=${HealthyOnly},enable=true 和weight>0
instances, err := namingClient.SelectInstances(vo.SelectInstancesParam{
    ServiceName: "demo.go",
    GroupName:   "group-a",             // 默认值DEFAULT_GROUP
    Clusters:    []string{"cluster-a"}, // 默认值DEFAULT
    HealthyOnly: true,
})
// SelectOneHealthyInstance将会按加权随机轮询的负载均衡策略返回一个健康的实例
// 实例必须满足的条件:health=true,enable=true and weight>0
instance, err := namingClient.SelectOneHealthyInstance(vo.SelectOneHealthInstanceParam{
    ServiceName: "demo.go",
    GroupName:   "group-a",             // 默认值DEFAULT_GROUP
    Clusters:    []string{"cluster-a"}, // 默认值DEFAULT
})
// Subscribe key=serviceName+groupName+cluster
// 注意:我们可以在相同的key添加多个SubscribeCallback.
err := namingClient.Subscribe(vo.SubscribeParam{
    ServiceName: "demo.go",
    GroupName:   "group-a",             // 默认值DEFAULT_GROUP
    Clusters:    []string{"cluster-a"}, // 默认值DEFAULT
    SubscribeCallback: func(services []model.SubscribeService, err error) {
        log.Printf("\n\n callback return services:%s \n\n", utils.ToJsonString(services))
    },
})
err := namingClient.Unsubscribe(vo.SubscribeParam{
    ServiceName: "demo.go",
    GroupName:   "group-a",             // 默认值DEFAULT_GROUP
    Clusters:    []string{"cluster-a"}, // 默认值DEFAULT
    SubscribeCallback: func(services []model.SubscribeService, err error) {
        log.Printf("\n\n callback return services:%s \n\n", utils.ToJsonString(services))
    },
})
serviceInfos, err := client.GetAllServicesInfo(vo.GetAllServiceInfoParam{
    NameSpace: "0e83cc81-9d8c-4bb8-a28a-ff703187543f",
    PageNo:   1,
    PageSize: 10,
  }),
success, err := configClient.PublishConfig(vo.ConfigParam{
    DataId:  "dataId",
    Group:   "group",
    Content: "hello world!222222"})
success, err = configClient.DeleteConfig(vo.ConfigParam{
    DataId: "dataId",
    Group:  "group"})
content, err := configClient.GetConfig(vo.ConfigParam{
    DataId: "dataId",
    Group:  "group"})
err := configClient.ListenConfig(vo.ConfigParam{
    DataId: "dataId",
    Group:  "group",
    OnChange: func(namespace, group, dataId, data string) {
        fmt.Println("group:" + group + ", dataId:" + dataId + ", data:" + data)
  },
})
err := configClient.CancelListenConfig(vo.ConfigParam{
    DataId: "dataId",
    Group:  "group",
})
configPage,err := configClient.SearchConfig(vo.SearchConfigParam{
    Search:   "blur",
    DataId:   "",
    Group:    "",
    PageNo:   1,
    PageSize: 10,
})
我们能从示例中学习如何使用Nacos go客户端
Nacos open-api相关信息可以查看文档 Nacos open-api wepsite.
Nacos产品了解可以查看 Nacos website.
我们非常欢迎大家为Nacos-sdk-go贡献代码. 贡献前请查看CONTRIBUTING.md
现在grpc基本上用的都是proto3, 官网 style guide
示例如下:
需要重点掌握slice和map的用法以及rpc的定义
syntax = "proto3";

option go_package="./;proto";

service Greeter {
  rpc GetConfigFromVPS(Empty) returns (BMKConfig);
  rpc SendConfigToVPS(stream BMKConfig) returns (Empty);
}

message BMKConfig {
  repeated Brand brands = 1;
  map<string,string> file_map = 2;
}

message Brand {
  string short_name = 1;
  string full_name = 2;
  string color = 3;
}

message Empty {
}
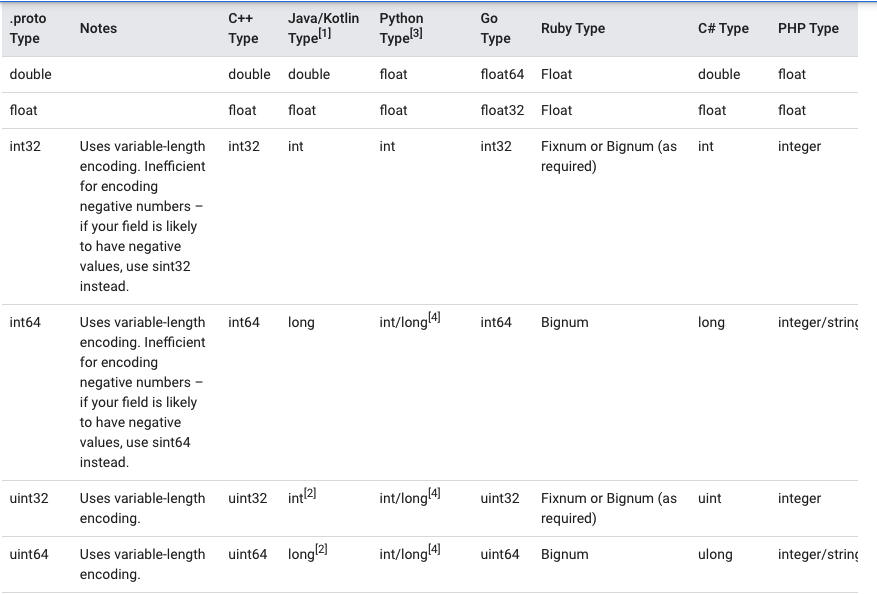
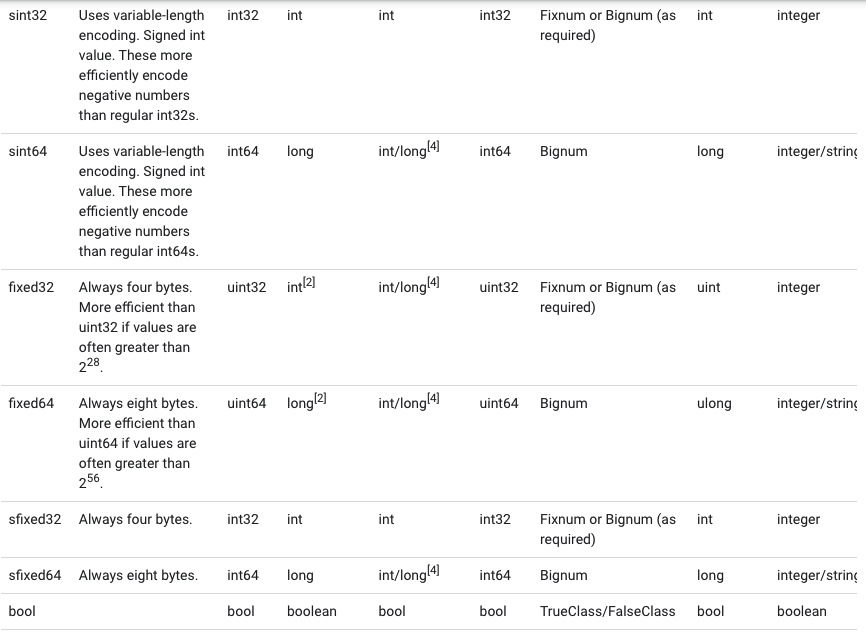
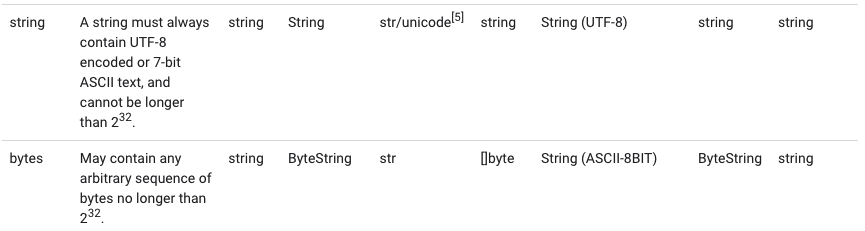
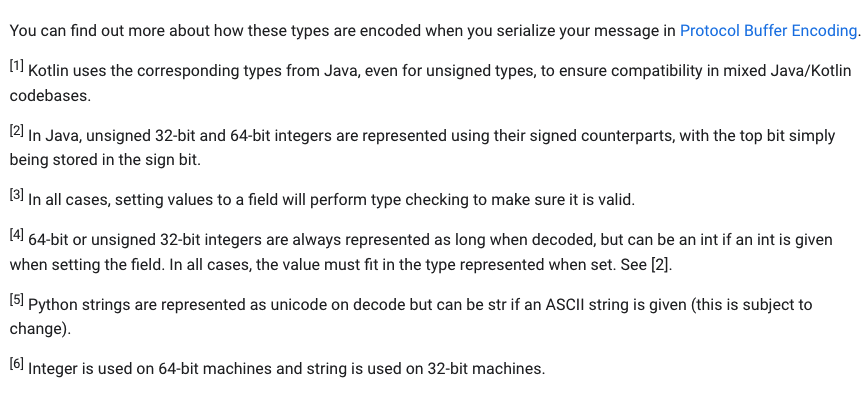
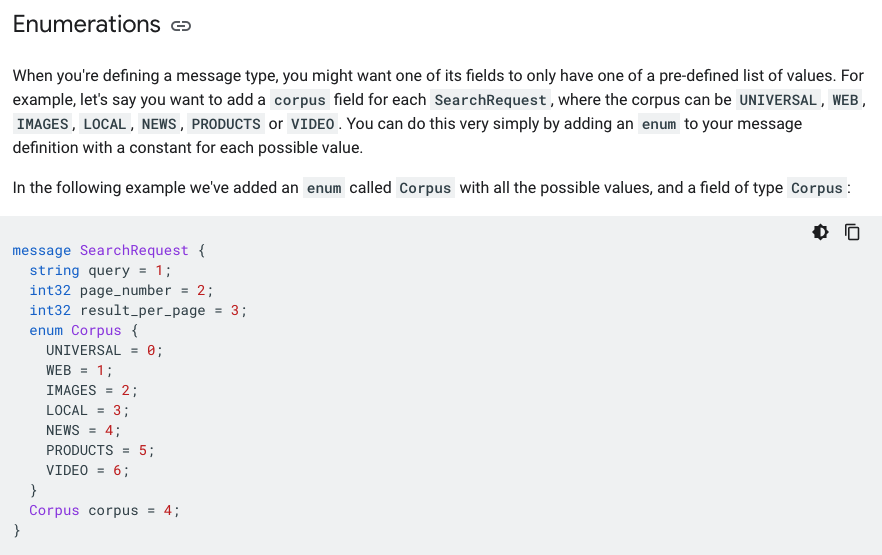
A scalar message field can have one of the following types – the table shows the type specified in the .proto file, and the corresponding type in the automatically generated class:

塔扇本来是给CPU降温用的,也可用来做制冷(配合水冷片TEC1-12706/40mm*40mm 水冷头使用)

上面是我买的带双风扇的CPU塔扇,因为我拿来是做制冷用的,因此4pin不能用(市面上也有3pin的),所以4pin头要剪掉
然后找出红黑线也就是正负极(一般红正黑负)
拿到这个风扇我瞬间傻眼了,4条线一样的颜色,这可难为我了,于是呢找了客服,还好他给了我一张接主板的图片

照葫芦画瓢,先找出引角露出来的那一侧

然后按照下面的原理图把12v的温控开关(温控开关需接上温度传感器否则无法显示正常温度)接好即可,温控开关默认温差为2度


按住set就可以设定温度了,比如你设为38度,那么当温度传感器的温度为38度就会通电,到38-2=36(t-2)度之后就会断电

水冷片需搭配制冷设备使用,比如塔扇
水冷片工作的时候一面发热,一面发冷(有字面):发热面需接制冷端(如塔扇),发冷面需接热源(如水冷头)