
· 7 min read

用户请求到达提供服务的服务器中间有很多的环节,导致服务获取用户真实的 ip 非常困难,大多数的框架及工具库都会封装各种获取用户真实 ip 的方法,在 exnet 包中也封装了各种 ip 相关的操作,其中就包含获取客户端 ip 的方法,比较实用的方法如下:

  • func ClientIP(r *http.Request) string ClientIP最大努力实现获取客户端 IP 的算法。 解析 X-Real-IP 和 X-Forwarded-For 以便于反向代理(nginx 或 haproxy)可以正常工作。
  • func ClientPublicIP(r *http.Request) string ClientPublicIP 尽最大努力实现获取客户端公网 IP 的算法。 解析 X-Real-IP 和 X-Forwarded-For 以便于反向代理(nginx 或 haproxy)可以正常工作。
  • func HasLocalIP(ip net.IP) bool HasLocalIP 检测 IP 地址是否是内网地址
  • func HasLocalIPddr(ip string) bool HasLocalIPddr 检测 IP 地址字符串是否是内网地址
  • func RemoteIP(r *http.Request) string RemoteIP 通过 RemoteAddr 获取 IP 地址, 只是一个快速解析方法。

获取用户真实ip地址

ClientIP 方法 与 ClientPublicIP 方法的实现类似,只是一个按照 http 协议约定获取客户端 ip, 一个按照约定格式查找到公网 ip。

在网络与服务架构、业务逻辑复杂的环境中,按照 http 协议约定的方式,并非总能获取到真实的 ip,在我们的业务中用户流量经由三方多层级转发(都是三方自己实现的http client) ,难免会出现一些纰漏,这时越往后的服务获取用户真实 ip 越加困难,你甚至不知道自己获取的 ip 是否是真实的。

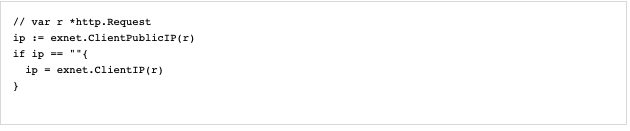
但是我们的客户经由三方转发而来的流量,那么客户极大多数甚至排除测试之外都是公网用户,结合使用 ClientPublicIP 和 ClientIP 方法总能更好的获取用户的真实 ip

用上面的方法总能有效的获取用户真实的 ip 地址,下面分析下两个方法的具体实现。

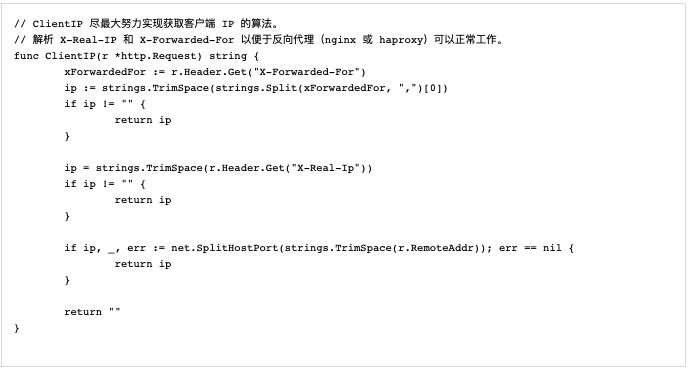
ClientIP 首先读取 X-Forwarded-For header 中用 , 分隔的第一个ip地址,如果这个地址不存在,就会从 X-Real-Ip header 中获取,如果还是不存在,说明流量并非是由反向代理转发而来,而是客户端直接请求服务,这时通过 http.Request.RemoteAddr 字段截取除去端口号的 ip 地址。

这个方法很简单,就是按照 http 约定的格式获取,其中 X-Forwarded-For 和 X-Real-Ip header 由反向代理填充,例如 nginx 或 haproxy。

ClientPublicIP 很简单,和 ClientIP 方法的读取顺序一样,只是试图中 X-Forwarded-For 列表中找到一个公网ip,如果没有检查 X-Real-Ip 是否是一个公网 ip,其次检查 http.Request.RemoteAddr 是否是公网ip,如果没有找到公网 ip 这返回一个空字符串。

这个方法可以让我们有机会优先获取到用户的公网 ip,往往公网 ip 对我们来说更有价值。

检查ip对否是内网地址

exnet 中还提供了检查 ip 地址是否是内网地址,这在有些情况下非常有用,比如:服务中有些接口只能内网访问,也就是只允许管理员访问(例如动态设定日志级别、查看服务 pprof 信息);我们想隐藏后端服务,只暴露给用户负载均衡(反向代理),用户无法直接访问我们的服务,这些方法及其有用,下面看看具体实现。

我的服务提供了动态设置日志级别,以便服务出现问题,可以第一时间查看调试日志分析具体原因,但是这个接口很危险,不应该暴露给公网,所以会用路由中间件检查请求是否来自公网,来自公网则返回 404。
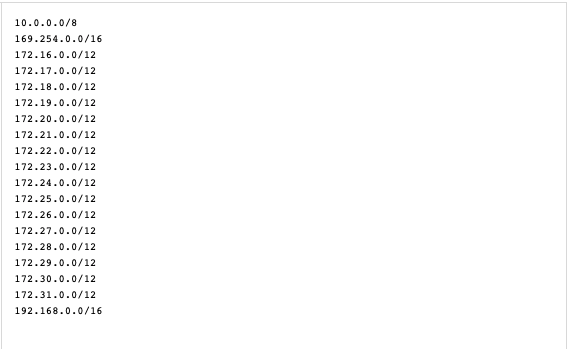
该方法认为如下地址段都是内网地址:

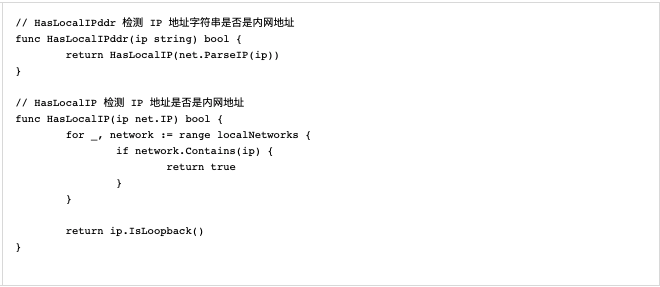
两个检查方法实现差异仅接受参数类型不一致,检查过程都是逐个对比内网 ip 段是否包含该ip地址,如果不包含则判断该地址是否是回环地址。

获取反向代理ip

如何判断改地址来自反向代理服务器呢,不同的反向代理实现都有些差异,4 层反向代理甚至可以提供用户的真实 ip(http.Request.RemoteAddr 是用户的ip,而不是反向代理的), 而隐藏自己的ip,这里说一下常见的方法。

往往 http.Request.RemoteAddr 保存最后一个连接服务的客户端 ip,我们获取反向代理的ip地址,最简单有效的方法就是通过 http.Request.RemoteAddr 获取, exnet 中提供了 RemoteIP 的快捷方法,实现如下:

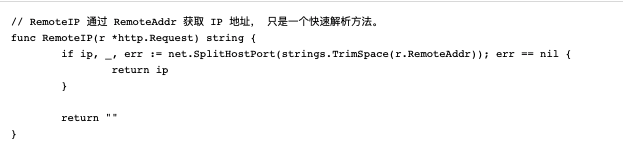
这是一个非常方便的脚手架,它仅仅切分 http.Request.RemoteAddr 的 ip 和端口,并返回有效的ip地址,但却可以简化我们的编写业务代码。

· One min read

检测方法

package main

import (
"fmt"
"reflect"
)

type B struct {
}

func main() {
a := "123"
fmt.Println(reflect.TypeOf(a)) //string
var b B
fmt.Println(reflect.TypeOf(b)) //main.B
}

为什么要检测变量类型?

1,前端传过来的数据,比如说bool,int你不知道会被转化成什么类型

2,使用别人的库,你也不知道实例是什么类型

用postman发送请求

终端打印结果

总结

前端传来的数据,到了gin的手里全是string

· 2 min read

linux系统下切换到root用户有多种方法,具体如下所示:

1、sudo命令

$ sudo

执行命令后,输入当前管理员用户的密码就可以短暂得到超级用户的权限了。

2、sudo -i命令

$ sudo -i

通过此命令直接输入当前管理员用户的密码就可以进入root用户了。

3、如果我们想一直使用root权限,可以使用su命令

首先执行如下命令重新设置root用户的密码。

$ sudo passwd root

然后就可以自由地切换到root用户了。

执行命令:

$ su

接着输入root用户的密码即可切换到root用户了。

如果我们想回到普通用户权限,直接执行命令su xxx或者是exit即可。

root@local:~# su --help

Usage:
su [options] [-] [<user> [<argument>...]]

Change the effective user ID and group ID to that of <user>.
A mere - implies -l. If <user> is not given, root is assumed.

Options:
-m, -p, --preserve-environment do not reset environment variables
-w, --whitelist-environment <list> don't reset specified variables

-g, --group <group> specify the primary group
-G, --supp-group <group> specify a supplemental group

-, -l, --login make the shell a login shell
-c, --command <command> pass a single command to the shell with -c
--session-command <command> pass a single command to the shell with -c
and do not create a new session
-f, --fast pass -f to the shell (for csh or tcsh)
-s, --shell <shell> run <shell> if /etc/shells allows it
-P, --pty create a new pseudo-terminal

-h, --help display this help
-V, --version display version

· 3 min read

react核心思想

通过数据操作dom,数据改变 dom会重新render;所以我们的侧重点是修改数据(修改数据要用到setState)

原则:immutable原则,不能直接修改state,要先copy一下

事件

事件名称首字母大写,eg: html 中 on-click => react: onClick

构造函数

构造函数是最先被执行的,所有this的绑定在这里执行可以节约性能

构造函数默认接受props,下面是固定写法

constructor(props) {
super(props)
}

jsx语法

凡事js出现html都要引入"react"

注释

{}放的是js,注释可以放在里面

style={{color:'red',fontSize:12px}} => 外层{}是放js的, 内层{}是一个js对象

渲染的时候不转义,虽然有可能被注入恶意代码,但是我们有这个需求:

<ul>
{
this.state.list.map((item,index)=>{
return <li key={index} dangerouslySetInnerHTML={__html: item}></li>
})
}
</ul>

可以看到所有html中套js {}最终返回的只是html/组件

属性冲突

  • label标签里的for => htmlFor
  • 普通标签的class => className

es6语法

return 可以简写成();只有一行的话,return是可以省略的

对象赋值:

const name = this.props.name;
const age = this.props.age;

//等效于
const {name, age} = this.props;

复制/拷贝:

var list = ["apple","pear","orange"]
var another = [...list] //把list中的元素一一展开,再用[]包裹成array

对象属性中,如果key字符串和value对应的变量名同名,可以简写,如下:

const list = [...this.state.list,"apple"]

this.setState({
list,
inputValue: ""
})

state

只要是react组件即class 无论是是在jsx语法中还是在其他函数中 要访问state属性 必须是 this.state.xxx

组件间传值

传值:父组件可以通过添加属性的方式向子组件中传递任何属性和方法(方法需要绑定父组件this,bind还可以接受参数,一般为索引index)

接收: 子组件通过this.props.xxx接收

· 7 min read

##TCP FLAGS##

Unskilled Attackers Pester Real Security Folks
==============================================
TCPDUMP FLAGS
Unskilled = URG = (Not Displayed in Flag Field, Displayed elsewhere)
Attackers = ACK = (Not Displayed in Flag Field, Displayed elsewhere)
Pester = PSH = [P] (Push Data)
Real = RST = [R] (Reset Connection)
Security = SYN = [S] (Start Connection)
Folks = FIN = [F] (Finish Connection)
SYN-ACK = [S.] (SynAcK Packet)
[.] (No Flag Set)

##USAGE##
Basic communication // see the basics without many options
# tcpdump -nS

Basic communication (very verbose) // see a good amount of traffic, with verbosity and no name help
# tcpdump -nnvvS

A deeper look at the traffic // adds -X for payload but doesn’t grab any more of the packet
# tcpdump -nnvvXS

Heavy packet viewing // the final “s” increases the snaplength, grabbing the whole packet
# tcpdump -nnvvXSs 1514

host // look for traffic based on IP address (also works with hostname if you’re not using -n)
# tcpdump host 1.2.3.4

src, dst // find traffic from only a source or destination (eliminates one side of a host conversation)
# tcpdump src 2.3.4.5
# tcpdump dst 3.4.5.6

net // capture an entire network using CIDR notation
# tcpdump net 1.2.3.0/24

proto // works for tcp, udp, and icmp. Note that you don’t have to type proto
# tcpdump icmp

port // see only traffic to or from a certain port
# tcpdump port 3389

src, dst port // filter based on the source or destination port
# tcpdump src port 1025 # tcpdump dst port 389

src/dst, port, protocol // combine all three
# tcpdump src port 1025 and tcp
# tcpdump udp and src port 53

You also have the option to filter by a range of ports instead of declaring them individually, and to only see packets that are above or below a certain size.

Port Ranges // see traffic to any port in a range
tcpdump portrange 21-23

Packet Size Filter // only see packets below or above a certain size (in bytes)
tcpdump less 32
tcpdump greater 128
[ You can use the symbols for less than, greater than, and less than or equal / greater than or equal signs as well. ]

// filtering for size using symbols
tcpdump > 32
tcpdump <= 128

[ Note: Only the PSH, RST, SYN, and FIN flags are displayed in tcpdump‘s flag field output. URGs and ACKs are displayed, but they are shown elsewhere in the output rather than in the flags field ]

Keep in mind the reasons these filters work. The filters above find these various packets because tcp[13] looks at offset 13 in the TCP header, the number represents the location within the byte, and the !=0 means that the flag in question is set to 1, i.e. it’s on.

Show all URG packets:
# tcpdump 'tcp[13] & 32 != 0'

Show all ACK packets:
# tcpdump 'tcp[13] & 16 != 0'

Show all PSH packets:
# tcpdump 'tcp[13] & 8 != 0'

Show all RST packets:
# tcpdump 'tcp[13] & 4 != 0'

Show all SYN packets:
# tcpdump 'tcp[13] & 2 != 0'

Show all FIN packets:
# tcpdump 'tcp[13] & 1 != 0'

Show all SYN-ACK packets:
# tcpdump 'tcp[13] = 18'

Show icmp echo request and reply
#tcpdump -n icmp and 'icmp[0] != 8 and icmp[0] != 0'

Show all IP packets with a non-zero TOS field (one byte TOS field is at offset 1 in IP header):
# tcpdump -v -n ip and ip[1]!=0

Show all IP packets with TTL less than some value (on byte TTL field is at offset 8 in IP header):
# tcpdump -v ip and 'ip[8]<2'

Show TCP SYN packets:
# tcpdump -n tcp and port 80 and 'tcp[tcpflags] & tcp-syn == tcp-syn'
# tcpdump tcp and port 80 and 'tcp[tcpflags] == tcp-syn'
# tcpdump -i <interface> "tcp[tcpflags] & (tcp-syn) != 0"

Show TCP ACK packets:
# tcpdump -i <interface> "tcp[tcpflags] & (tcp-ack) != 0"

Show TCP SYN/ACK packets (typically, responses from servers):
# tcpdump -n tcp and 'tcp[tcpflags] & (tcp-syn|tcp-ack) == (tcp-syn|tcp-ack)'
# tcpdump -n tcp and 'tcp[tcpflags] & tcp-syn == tcp-syn' and 'tcp[tcpflags] & tcp-ack == tcp-ack'
# tcpdump -i <interface> "tcp[tcpflags] & (tcp-syn|tcp-ack) != 0"

Show TCP FIN packets:
# tcpdump -i <interface> "tcp[tcpflags] & (tcp-fin) != 0"

Show ARP Packets with MAC address
# tcpdump -vv -e -nn ether proto 0x0806

Show packets of a specified length (IP packet length (16 bits) is located at offset 2 in IP header):
# tcpdump -l icmp and '(ip[2:2]>50)' -w - |tcpdump -r - -v ip and '(ip[2:2]<60)'

More Details:
http://danielmiessler.com/study/tcpdump/

Tcp flag is at offset 13 in the TCP header. So we can use tcp[13] to filter TCP flags.

In tcpdump‘s flag field output, we can see these flags. Please check this post for more details about how to filter tcp packets with tcp flags.

proto[x:y] : will start filtering from byte x for y bytes. ip[2:2] would filter bytes 3 and 4 (first byte begins by 0)

proto[x:y] & z = 0 : will match bits set to 0 when applying mask z to proto[x:y]

proto[x:y] & z !=0 : some bits are set when applying mask z to proto[x:y]

proto[x:y] & z = z : every bits are set to z when applying mask z to proto[x:y]

proto[x:y] = z : p[x:y] has exactly the bits set to z

What are TCP flags?

Each TCP flag corresponds to 1 bit in size. The list below describes each flag in greater detail. Additionally, check out the corresponding RFC section attributed to certain flags for a more comprehensive explanation.

  • SYN - The synchronisation flag is used as a first step in establishing a three way handshake between two hosts. Only the first packet from both the sender and receiver should have this flag set. The following diagram illustrates a three way handshake process.

  • ACK - The acknowledgment flag is used to acknowledge the successful receipt of a packet. As we can see from the diagram above, the receiver sends an ACK as well as a SYN in the second step of the three way handshake process to tell the sender that it received its initial packet.

  • FIN - The finished flag means there is no more data from the sender. Therefore, it is used in the last packet sent from the sender.

  • URG - The urgent flag is used to notify the receiver to process the urgent packets before processing all other packets. The receiver will be notified when all known urgent data has been received. See RFC 6093 for more details.

  • PSH - The push flag is somewhat similar to the URG flag and tells the receiver to process these packets as they are received instead of buffering them.

  • RST - The reset flag gets sent from the receiver to the sender when a packet is sent to a particular host that was not expecting it.

  • ECE - This flag is responsible for indicating if the TCP peer is ECN capable. See RFC 3168 for more details.

  • CWR - The congestion window reduced flag is used by the sending host to indicate it received a packet with the ECE flag set. See RFC 3168 for more details.

  • NS (experimental) - The nonce sum flag is still an experimental flag used to help protect against accidental malicious concealment of packets from the sender. See RFC 3540 for more details.

· 5 min read

前言

众所周知,git bash下是不能实现多标签页的,每次使用git bash的ssh连接多台机器时,需要打开多个git bash程序。而tmux能解决这个问题,并且tmux比这个还要强大。

tmux就相当于linux的screen

tmux是一个终端复用器(terminal mutilplexer)。何谓终端复用器呢?平时我们的使用git bash终端通过ssh连接到远程之后,会话就开始了,当关闭终端时,会话就结束,远程正在执行的任务也会结束,即会话和终端窗口是绑定在一起的。tmux就是为了解决这个问题,让窗口和会话解绑。

git bash安装tmux

git bash中执行以下命令,即可安装tmux。如果以下操作完tmux没法使用,注意git升级到最新版,我遇到的坑就是git2.9版本安装完tmux后打tmux命令没反应。升级完git2.26后即可。

git clone https://github.com/xnng/bash.git
cd bash
cp tmux/bin/* /usr/bin
cp tmux/share/* /usr/share -r

新建tmux配置文件

vi ~/.tmux.conf

原因复制如下配置到上面的配置文件中即可。

setw -g mouse
set-option -g history-limit 20000
set-option -g mouse on
bind -n WheelUpPane select-pane -t= \; copy-mode -e \; send-keys -M
bind -n WheelDownPane select-pane -t= \; send-keys -M

tmux简单操作

  • 新建一个会话并命名为work:tmux new -s work 这时打开了一个tmux会话,窗口底部是一个绿色的信息显示条
  • 输入tmux detach命令,分离窗口和会话,这是你会退出tmux会话,回到git bash终端
  • 输入tmux ls,你会看到自己后台正在跑的tmux会话,这时即使你关闭git bash终端,会话也不会关闭,此时可以输入tmux new -s mytest新建一个新会话,相当于开了两个窗口了。
  • 使用tmux switch -t mytest可以切换到mytest会话
  • 删除指定的session: tmux kill-session -t SESSION_NAME
  • 临时退出session 让其在后台继续运行 注意脱离了会话才能关闭xshell 不然当前会话开启的服务会被停掉:ctrl + b d(注意:此命令是ctrl和b同时按下,然后全部松开,再单独按下d)
  • 挂起当前session:ctrl + b ctrl + z (注意:此命令是先同时按下ctrl和b, 然后都松开,再同时按下ctrl和z)
  • 连接上某个已存在的session:tmux a -t SESSION_NAME

以上,还有许多的快捷键可以使用,如,在tmux会话中,按ctrl+b一下,再按以下w键,会弹出所有窗口的列表,此时你选择一个窗口即可,切换非常方便。

tmux介绍

tmux的层次划分为:一个session下有多个window,一个window下有多个pane(面板)

  • 新建session:tmux new -s {sessionName},直接输入tmux也可新建一个自动命名的session
  • 新建window:tmux new-window -n {windowName}
  • 新建pane:tmux split-window(划分上下两个窗格),tmux split-window -h(划分左右两个窗格)
  • 快捷键:显示所有window:C-b w表示先按一次ctrl-b,再按一次w

tmux内容复制

按住shift选择内容后按右键选复制,记住是按住shift键。粘贴时可以按住shift键点击右键,再选择粘贴。

tmux常用快捷键

tmux的快捷键都有前缀键,默认为ctrl+b,记为C-b,需先按前缀键再按指定的键,如C-b w打开window列表,表示按前缀键后按w,依此类推。一般的操作流程和快捷键如下:

  • 查看帮助:C-b ?
  • 新建session:建议还是使用命令行比较好,因为可以命名session:tmux new -s {sessionName}
  • 断开/分离当前会话:C-b d
  • 新建窗口:C-b c,或命名tmux new-window -n {windowName}
  • 打开窗口列表用于切换窗口:C-b w
  • 关闭窗口:C-b &
  • 垂直分割窗格:C-b % 关闭窗格:C-b x

· One min read

通常我们很少会见到.xz后缀的压缩包

我也是一头雾水,然后google了一下

# 用法
tar -xf archive.tar.xz